Anonymous

TR7 electronic ignition

Here’s where to discuss anything specific about your standard(ish) car or something that applies to the model in general.
TR Tony
TRemendous
Posts: 2882
Joined: 29 Oct 2004 13:38
Location: United Kingdom
Contact:

TR7 electronic ignition

Postby TR Tony » 17 Apr 2008 15:48

Have a look here, Odd:

http://www.123ignition.nl/


Tony

Odd
TRiffic
Posts: 1969
Joined: 19 Oct 2007 08:49
Location: Sweden
Contact:

TR7 electronic ignition

Postby Odd » 17 Apr 2008 17:38

Thanks. Looks interesting, albeit a bit pricey...
But the day my Lucas dizzy dies - definitely interesting!

jeffremj
Wedgista
Posts: 1285
Joined: 02 Jan 2005 22:47
Location: United Kingdom
Contact:

TR7 electronic ignition

Postby jeffremj » 17 Apr 2008 22:58

Looks interesting, albeit a bit pricey...

200 quid! If you are in that price range, you won't do any better than my Megajolt Lite Jr. system. It is a computer controlled system where you can program your own ignition map:

http://forum.triumphtr7.com/topic.asp?ARCHIVE=true&TOPIC_ID=2658

and here:

http://forum.triumphtr7.com/topic.asp?TOPIC_ID=4702

TR Tony
TRemendous
Posts: 2882
Joined: 29 Oct 2004 13:38
Location: United Kingdom
Contact:

TR7 electronic ignition

Postby TR Tony » 18 Apr 2008 10:32

It's more like £350 for the Rover V8 version :shock:

Does make the Megajolt look like very good value. Probably more work to install the Megajolt but I guess with either system once installed it should be largely maintenance free.

Of course Megajolt can be fitted to the 2L engine as well, so that is a big plus point. Something to think about Stevie?

Tony
Image

jeffremj
Wedgista
Posts: 1285
Joined: 02 Jan 2005 22:47
Location: United Kingdom
Contact:

TR7 electronic ignition

Postby jeffremj » 18 Apr 2008 16:39

It's more like £350 for the Rover V8 version


Does make the Megajolt look like very good value. Probably more work to install the Megajolt but I guess with either system once installed it should be largely maintenance free.

I can get some coil brackets made up and will sell at cost, but need 10 orders minimum.

The trigger bracket can be made with the simplest of tools.

The triggerwheel (for Rover V8) is available from here:

http://trigger-wheels.com/store/

The 8V triggerwheel will have to be bespoke and more difficult to source but my photos will help any metal basher.

Don't forget that the EDIS coil pack actually has 2 coils, so the V8 installation has 4 coils! Each one can operate well up to 9000 rpm.

john 215
TRemendous
Posts: 6867
Joined: 03 Dec 2006 17:12
Location: United Kingdom
Contact:

TR7 electronic ignition

Postby john 215 » 18 Apr 2008 21:21

Hi,
Planning on fitting one of these to my V8's twin point Mallory dizzy this weekend-

http://www.v8tuner.co.uk/product.php?id=594

If you check the price of replacement points and condensor it will pay for itself in 2 changes.
Will let you know how it goes for those intrested [?]
Cheers John

LIVE LIFE A QUARTER OF A MILE AT A TIME!
1979 3.5 FHC(STATUS PENDING!!)
Image
1982 2.0 DHC NOW A 4.6 WILL BE ON THE ROAD VERY SOON!

moestr7v8
Swagester
Posts: 619
Joined: 02 Apr 2007 22:42
Location: United Kingdom
Contact:

TR7 electronic ignition

Postby moestr7v8 » 19 Apr 2008 00:35

Hi John let us know how you get on if you do fit this conversion,interested myself for my v8.
Regards Moe

john 215
TRemendous
Posts: 6867
Joined: 03 Dec 2006 17:12
Location: United Kingdom
Contact:

TR7 electronic ignition

Postby john 215 » 19 Apr 2008 16:31

Hi Moe,
Fitted the dizzy side of things this afternoon,
First removed the dizzy, then the consedensor and base plate, complete with points, then had to pull off the cam of the dizzy shaft,lucky i had a puller at work that fitted this as with 8 sides not the most straight forward thing to do!!
Remove from TR7 distributor.JPG
Removed TR7 distributor parts
Remove from TR7 distributor.JPG (13.96 KiB) Viewed 4762 times


Items to be fitted-
Electronic TR7 distributor parts.JPG
Added TR7 distributor parts
Electronic TR7 distributor parts.JPG (12.47 KiB) Viewed 4762 times


Then had to drill a 3/8 hole in dizzy side to allow wires through and block up old hole with grommet supplied. Dropped in new base plate and secured,refitted advance unit.
TR7 distributor wires.JPG
Drill Hole for wires
TR7 distributor wires.JPG (17.46 KiB) Viewed 4762 times


The rotor arm has 8 cut outs to switch the coil on and off via optic
TR7 electric rotor arm.JPG
TR7 electric rotor arm.JPG (11.74 KiB) Viewed 4762 times


Connect up the wiring to supplied loom and connector and reinstall dizzy.
TR7 Dizzy.JPG
TR7 Dizzy.JPG (13.81 KiB) Viewed 4762 times


Will wire up tommorrow and let you know how it goes looks straight forward.
Cheers John

LIVE LIFE A QUARTER OF A MILE AT A TIME!
1979 3.5 FHC(STATUS PENDING!!)
Image
1982 2.0 DHC NOW A 4.6 WILL BE ON THE ROAD VERY SOON!

FI Spyder
TRemendous
Posts: 8917
Joined: 03 Jul 2006 19:54
Location: Canada

TR7 electronic ignition

Postby FI Spyder » 20 Apr 2008 06:09

My eyes are going bonkers John. Tip: digital cameras have macro setting that allows them to focus up to an inch or so away for sharp focus on close ups. Just a question of what button sets it.

TR7 Spider - 1978 Spifire - 1976 Spitfire - 1988 Tercel 4X4 - Kali on Integra - 1991 Integra

john 215
TRemendous
Posts: 6867
Joined: 03 Dec 2006 17:12
Location: United Kingdom
Contact:

Postby john 215 » 20 Apr 2008 14:13

Hi,
Sorry for the quality of pictures [:I] my camera is years old and i still have'nt figured out how to work it!! Should read the instuctions if i could find them!!!
Wired up dizzy to day, simple enough, 3 wires,
Green- Neg side of coil.
Red - 12 volts
Brown- Earth

Image


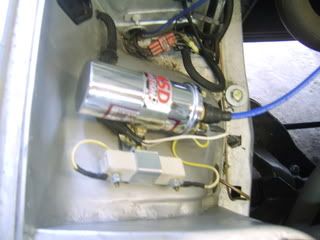
Also replaced coil with a Mallory at the same time, running an external resistor rather than the one that is standard in the loom, bypassed this when i had the interior stripped out, i guess there is no reason why you cant leave as standard as long as resistance is .7 - 1.5 ohms, which the Mallory one i have is (and is rec to be used with the coil)
Cheers John.

LIVE LIFE A QUARTER OF A MILE AT A TIME!
1979 3.5 FHC(STATUS PENDING!!)
Image
1982 2.0 DHC NOW A 4.6 WILL BE ON THE ROAD VERY SOON!
Read My Blog http://www.waringstowntr7s.co.uk/blogs/ ... hp/John215

moestr7v8
Swagester
Posts: 619
Joined: 02 Apr 2007 22:42
Location: United Kingdom
Contact:

Postby moestr7v8 » 21 Apr 2008 00:00

Thanks John brilliant job will print it off and use it as reference when the time comes.
Cheers Moe

Orophin
Rust Hunter
Posts: 119
Joined: 17 Oct 2007 19:12
Location: United Kingdom
Contact:

Postby Orophin » 24 Apr 2008 20:04

I bought my full lumination electronic distributor and ignition kit off ebay for about £40 and so far has worked very well when the timing is correct. Hardest part is taking the bolts out of the old distributor and then using them to fix the new one in because in the 2L engine they are a pig to get at.

stevie_a
TRemendous
Posts: 3327
Joined: 19 Jun 2005 10:28
Location: Glasgow'ish

Postby stevie_a » 26 Apr 2008 16:48

<blockquote id="quote"><font size="1" face="Century Gothic, Verdana, Arial, Helvetica" id="quote">quote:<hr height="1" noshade id="quote"><i>Originally posted by stevie_a</i>

<font color="purple"><b>I am thinking of putting electronic ignition on my car

But what is good and how easy is it to fit

Is this any good[url="http://cgi.ebay.co.uk/ws/eBayISAPI.dll?ViewItem&rd=1&item=320235445871&ssPageName=STRK:MEWA:IT&ih=011"]<u>]<b><font color="red">clicky</font id="red"></b></u>[/url]

Comments please </b> </font id="purple"><hr height="1" noshade id="quote"></font id="quote"></blockquote id="quote">


<font color="purple"><b>Ok going back to the start of the thread

I have now got a Lumenition electronic ignition and have started to install it

But I have had to stop as I have a problem

I have the module fitted and wired up

Distributer removed and stripped

Magic eye fitted

At the moment I am ready to fit the chopper to the underside of the weights

There is the problem

The came with two choppers I do not know witch one to use

Both look very similar when fitted the tabs line up with the lobes and the other

Lines up with the flats of the distributer

(I.E. the lobes that would open the points on the shaft )

I hope I am explaining this correct …

Which one do I fit ???</b></font id="purple">

Image Image Image

<font size="4"><font color="green"><i>If it's not broke don't fix it.</i></font id="green"></font id="size4">

stevie_a
TRemendous
Posts: 3327
Joined: 19 Jun 2005 10:28
Location: Glasgow'ish

Postby stevie_a » 01 May 2008 22:33

<font color="purple"><b>I have now got the Lumenition Optronic Electronic Ignition fitted

Starts perfect , runs smother , it’s faster , and acceleration is more responsive

will get it taxed tomorrow

thanks for your help


roll on the summer...[;)]</b></font id="purple">

Image Image Image

<font size="4"><font color="green"><i>If it's not broke don't fix it.</i></font id="green"></font id="size4">

stevie_a
TRemendous
Posts: 3327
Joined: 19 Jun 2005 10:28
Location: Glasgow'ish

Postby stevie_a » 02 May 2008 21:43

<font color="purple"><b>Now that the car is out of hibernation I have started to do some work

I took the car out of the garage after the winter and to my horror it was running very rough

Back firing so loud that would be excused for wanting to ware ear plugs ( no joke)

Put in new plugs and oil etc

Started to put in new points and condenser ( this is the start of my problems )

This is where the distributor is situated not a lot of space in there


Image


And to top it the Delco distributor weights are above the points so to set them it is recommended you remove the distributor

Set the points and replace back in ( it is not that easy I tell you)

If you look at the securing bolts at the base it is almost imposable to get in there but I did


Image


So I did not have to do this job again I decided to install electronic ignition

I fitted Lumenition Optronic Electronic Ignition

I fitted the module at the back of the bulkhead

Image

Set the timing to TDC


Image

Then removed the distributor

Image

Fitted the eye and chopper in to the distributor and started to put the distributor backing

This is where it turned nasty as I could not get the bolts back in

and by now my hand was very sore

Image

I asked on this forum for an easy way to get the bolts in

and colonel bogey came up with

Tip of the week

a corn flake packet cut a strip off and put a hole in it

put the bolt and washers through the hole and use this to locate the hole


Image

It is now all fitted and I wish I had did it a long time ago

The car starts quicker it runs smoother it runs faster and when you accelerate it picks up quicker

Now I just have to wash the car give it a polish ready for the first show of the year on Sunday</b></font id="purple">

Image Image Image

<font size="4"><font color="green"><i>If it's not broke don't fix it.</i></font id="green"></font id="size4">

Post Reply

Who is online

Users browsing this forum: No registered users and 228 guests