Anonymous

Front Sub-Frame Bushing Order

The all purpose forum for any TR7/8 related topics.
cozyheatdave
Rust Hunter
Posts: 192
Joined: 17 Jul 2009 12:24
Location: USA
Contact:

Front Sub-Frame Bushing Order

Postby cozyheatdave » 06 Mar 2011 01:00

I have the pictures from Rimmers and the manual, but can't seem to figure the right order or placement for the washers, bushings, and internal bushes for the sub-frame.

Rimmers and the manual doesn't show the body frame. I have a large thin washer that seems to be going in the wrong place.

I know when I drop the bolt in, there is a large thick flat washer on top of the body frame. Then under the body frame but above the sub-frame I get lost...

A good diagram or photo would be appreciated.
Both front and back bushes.

**************
I couldn't repair my brakes, so I made my horn louder.
[img=left] http://i887.photobucket.com/albums/ac78 ... 1296600038 [/img=left]

nick
TRiffic
Posts: 1679
Joined: 07 Apr 2005 02:00
Location: USA
Contact:

Postby nick » 06 Mar 2011 15:49

The stack up on the to front subframe is as follows from the bolt head down. These go on the top front of the subframe: Large washer (ukc312), small bush with metal insert. These go below the subfram: Washer (ukc670), large bush with insert, washer (159798), nut. The rear is similar with different part numbers. Sorry, I don't have the picture.


Image
nick
'79 TR7

PeterTR7V8
TRemendous
Posts: 2914
Joined: 10 Jun 2008 02:22
Location: New Zealand
Contact:

Postby PeterTR7V8 » 06 Mar 2011 18:18

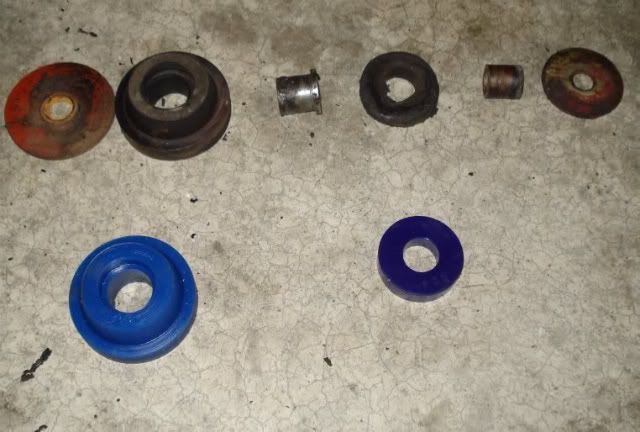
Hope this helps.

Image

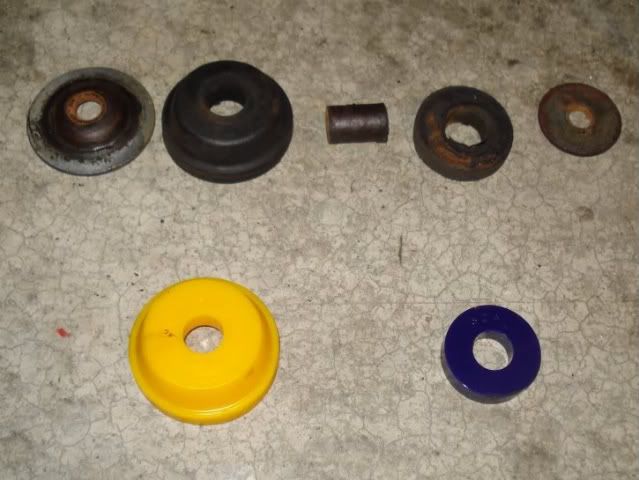
The components in these pictures are arranged Left to Right = bottom to Top

Front set.

Image

Rear set.

Image

Image

The map: http://tinyurl.com/wedgemap . The blog: http://www.forum.triumphtr7.com/topic.asp?TOPIC_ID=8548

Odd
TRiffic
Posts: 1969
Joined: 19 Oct 2007 08:49
Location: Sweden
Contact:

Postby Odd » 07 Mar 2011 09:20

How about editing in a line through those last pictures indicating where the body/frame is
and maybe another line indicating where the X-member is? Inbetween the various parts...

Should explain it once and for all.
---
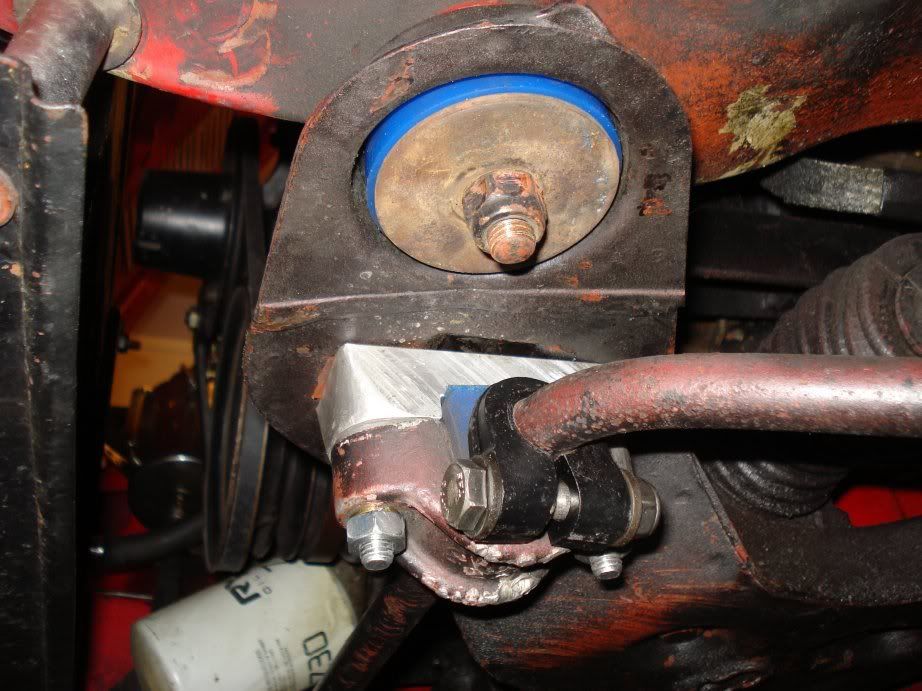
Well, no-one did it - so I had to do it myself... [;)]

Image

cozyheatdave
Rust Hunter
Posts: 192
Joined: 17 Jul 2009 12:24
Location: USA
Contact:

Postby cozyheatdave » 13 Mar 2011 16:51

Thanks so much for the diagrams. Very helpful. Rimmers shows another large but thin washer. But to use the washer they show it interferes with the bushing. So, like your diagram, I left the washer out.

**************
I couldn't repair my brakes, so I made my horn louder.
[img=left] http://i887.photobucket.com/albums/ac78 ... 1296600038 [/img=left]
Odd
TRiffic
Posts: 1969
Joined: 19 Oct 2007 08:49
Location: Sweden
Contact:

Postby Odd » 14 Mar 2011 08:19

Rimmers is the thin TR7 version of the washer, mine (in the pictures) are the thicker TR8 version.
You should not be without it, the washer is needed, I think the bushing will eat itself through the
body frame if the steel washer is missing. At least from the looks of my old washers...

Image <font color="red"><b>My two 1980 Wedges...</b></font id="red">
Image

Shauniedawn
Swagester
Posts: 867
Joined: 09 Feb 2007 20:17
Location: United Kingdom
Contact:

Postby Shauniedawn » 14 Mar 2011 09:24

Moderators!

This is a FAQ, wouldn't it be useful to make Odd's contribution only sticky - say with an explanatory sentence or two?

Shaun

Image

Milanoverde
Rust Hunter
Posts: 119
Joined: 10 Aug 2008 02:38
Location: USA
Contact:

Postby Milanoverde » 11 Jul 2011 22:14

Should we be greasing these bushings when we install?

Odd
TRiffic
Posts: 1969
Joined: 19 Oct 2007 08:49
Location: Sweden
Contact:

Postby Odd » 12 Jul 2011 09:13

Very slightly. Only enough to seal the steel from moisture ingress...

dursleyman
TRiffic
Posts: 1572
Joined: 11 Jun 2007 22:55
Location: United Kingdom
Contact:

Postby dursleyman » 06 Aug 2011 23:34

Odd, many thanks for the pictures it made it so much easier and gave me confidence that I was doing it right. Turned out to be a really easy job.

Now, the anti-roll bar and track control arms were a complete B*****D to get lined up.

Russ

1980 TR7 DHC
Dursley
UK
Image
[http://www.flickr.com/photos/16162151@N05/5921648270/in/photostream]

Odd
TRiffic
Posts: 1969
Joined: 19 Oct 2007 08:49
Location: Sweden
Contact:

Postby Odd » 07 Aug 2011 09:35

<blockquote id="quote"><font size="1" face="Century Gothic, Verdana, Arial, Helvetica" id="quote">quote:<hr height="1" noshade id="quote"><i>Originally posted by dursleyman</i>
Now, the anti-roll bar and track control arms were a complete B*****D to get lined up.<hr height="1" noshade id="quote"></font id="quote"></blockquote id="quote"> Why?
Use the right tool for the right job, buy - beg - steal or borrow it. The rest is easy:
I just applied some 'extra force' - a few pump strokes - and the sway bar slid right in:

Image

Didn't even get sweaty... [8D] This is dads TR7V8 btw, not my TR8...

(And; that hydraulic tools kit was a (Birthday? Christmas? or something) gift from my better half
- when she had seen pic's of how I did the same job on my own car several years ago. She said
she wanted me to have "All fingers still on my hands, not scattered all over the garage!" She's a gem!:

Image


Image <font color="red"><b>My two 1980 Wedges...</b></font id="red">
Image

dursleyman
TRiffic
Posts: 1572
Joined: 11 Jun 2007 22:55
Location: United Kingdom
Contact:

Postby dursleyman » 07 Aug 2011 11:21

Odd, wish I had the same facilities. I used to run rally cars from a friends bodyshop and he had all that sort of kit and it made life much easier. Now its just me and basic tools, plus a fair bit of bad language and fiendish cunning to make things happen. It does give quite a bit of satisfaction when its finally together.

Please keep showing us your stuff because its nice to know how it can be done properly.

If I could just find a cheap body jack on Ebay - - -

Russ

1980 TR7 DHC
Dursley
UK
Image
[http://www.flickr.com/photos/16162151@N05/5921648270/in/photostream]

RadioGuy
Swagester
Posts: 534
Joined: 10 Apr 2010 15:11
Location: USA
Contact:

Postby RadioGuy » 07 Aug 2011 12:59

<blockquote id="quote"><font size="1" face="Century Gothic, Verdana, Arial, Helvetica" id="quote">quote:<hr height="1" noshade id="quote">and fiendish cunning to make things happen<hr height="1" noshade id="quote"></font id="quote"></blockquote id="quote">


Ahhhh. My thought exactly[8D]

ImageImageImage
Maintained on Saturday…Drive on Fun-Day !!! 1976 FHC - 1980 DHC

DNK
TRemendous
Posts: 2711
Joined: 16 Sep 2007 03:49
Location: USA
Contact:

Postby DNK » 28 Dec 2011 05:02

<blockquote id="quote"><font size="1" face="Century Gothic, Verdana, Arial, Helvetica" id="quote">quote:<hr height="1" noshade id="quote"><i>Originally posted by dursleyman</i>

...Now, the anti-roll bar and track control arms were a complete B*****D to get lined up.<hr height="1" noshade id="quote"></font id="quote"></blockquote id="quote">


Russ, discussed this on the list ,or somewhere,and someone mentioned if you do the bar with the suspension in running position...ie... on ramps in normal driving , it makes it a lot easier.

Don
"No More Cars For You"
71 TR6- Perpetual remodel
80 TR7 V8 Kick in the pants
Image

darrellw
Swagester
Posts: 559
Joined: 25 May 2011 18:44
Location: USA
Contact:

Postby darrellw » 29 Dec 2011 05:33

Doing some other work under my car, I noticed that the subframe bushings are looking a bit tired. I have a new set of poly, and I'm thinking I might as well swap them in while I have the car up. Can I support the subframe with a jack, remove the bolts, drop the subframe/engine down a bit, and replace them? How much does the subframe need to drop?

Darrell Walker
66 TR4A IRS-SC CTC67956L
81 TR8 SATPZ458XBA406206
Vancouver, WA, USA

Post Reply

Who is online

Users browsing this forum: No registered users and 227 guests

cron